Deploying a Hugo Website to GitHub Pages Using GitHub Actions


After setting up Ghost for my personal website, I was looking for something a bit simpler. While Ghost is an incredibly powerful platform, it felt like an overkill for my needs—especially for a personal website.
I still have a soft spot for the straightforwardness of HTML and CSS, so I started scouting for alternatives that allow me to go back to that simplicity.
After a bit of digging around static site generators, I decided to go with Hugo. Given my familiarity with GitHub and the fact that it offers free hosting for static websites, it made sense to deploy my Hugo site using GitHub Pages.
I did consider Jekyll and Astro as alternatives, but then decided to go with Hugo.
Here's why I chose it over the likes of Jekyll and Astro:
- Speed: Hugo is known for its incredible build speed, which is a huge plus.
- Flexibility: The theming system in Hugo is rich and extensive.
- Built-In Features: Hugo comes with a lot of built-in functionalities that would require plugins in other platforms.
- Community: There is an active community and tons of resources to learn from.
Here are the steps I followed to get Hugo up and running using GitHub pages.
Let’s get started
To get going, I'll need to install Hugo and create a new site. Then, we'll move on to GitHub Pages setup.
Step 1: Install Hugo Locally
First, open the terminal and install Hugo on your local machine. You can find the installation instructions for your OS on Hugo's official website.
# Install Hugo on macOS
brew install hugo

# Or on Linux
sudo apt install hugo
Step 2: Create a new Hugo Site
If you haven't already, create a new Hugo site:
hugo new site my-hugo-siteOr navigate to your existing Hugo site directory.
Step 3: Run Hugo Server Locally
Before pushing anything to GitHub, let's run the site locally to make sure everything is set up correctly.
# Navigate to your Hugo site's directory
cd my-hugo-site

# Run Hugo server
hugo server -D
Visit http://localhost:1313/ in your browser to see your site.
Step 4: Initialize Git and Create GitHub Repository
Initialize a Git repository in your Hugo project folder and link it to a new GitHub repository.
git init
git remote add origin https://github.com/YourUsername/YourRepo.git
git add .
git commit -m "Initial commit"
git push -u origin main
Step 4: Add GitHub Actions Workflow
Create a folder named .github and inside it another folder named workflows. Then, create a new YAML file, for example, hugo.yml. This is where your GitHub Actions workflow will be defined.
Copy and paste the GitHub Actions YAML configuration from Hugo's website into this file. Make sure to adjust the HUGO_VERSION environment variable to match your Hugo version. Save the file.
Here's the one I ended up using -
# Sample workflow for building and deploying a Hugo site to GitHub Pages
name: Deploy Hugo site to Pages

on:
  # Runs on pushes targeting the default branch
  push:
    branches:
      - main

  # Allows you to run this workflow manually from the Actions tab
  workflow_dispatch:

# Sets permissions of the GITHUB_TOKEN to allow deployment to GitHub Pages
permissions:
  contents: read
  pages: write
  id-token: write

# Allow only one concurrent deployment, skipping runs queued between the run in-progress and latest queued.
# However, do NOT cancel in-progress runs as we want to allow these production deployments to complete.
concurrency:
  group: "pages"
  cancel-in-progress: false

# Default to bash
defaults:
  run:
    shell: bash

jobs:
  # Build job
  build:
    runs-on: ubuntu-latest
    env:
      HUGO_VERSION: 0.115.4
    steps:
      - name: Install Hugo CLI
        run: |
          wget -O ${{ runner.temp }}/hugo.deb https://github.com/gohugoio/hugo/releases/download/v${HUGO_VERSION}/hugo_extended_${HUGO_VERSION}_linux-amd64.deb \
          && sudo dpkg -i ${{ runner.temp }}/hugo.deb
      - name: Install Dart Sass
        run: sudo snap install dart-sass
      - name: Checkout
        uses: actions/checkout@v3
        with:
          submodules: recursive
          fetch-depth: 0
      - name: Setup Pages
        id: pages
        uses: actions/configure-pages@v3
      - name: Install Node.js dependencies
        run: "[[ -f package-lock.json || -f npm-shrinkwrap.json ]] && npm ci || true"
      - name: Build with Hugo
        env:
          # For maximum backward compatibility with Hugo modules
          HUGO_ENVIRONMENT: production
          HUGO_ENV: production
        run: |
          hugo \
            --gc \
            --minify \
            --baseURL "${{ steps.pages.outputs.base_url }}/"
      - name: Upload artifact
        uses: actions/upload-pages-artifact@v1
        with:
          path: ./public

  # Deployment job
  deploy:
    environment:
      name: github-pages
      url: ${{ steps.deployment.outputs.page_url }}
    runs-on: ubuntu-latest
    needs: build
    steps:
      - name: Deploy to GitHub Pages
        id: deployment
        uses: actions/deploy-pages@v2
Step 5: Push Workflow to GitHub
Add the .github folder to your Git repository and push it to GitHub.
git add .github/workflows/deploy.yml
git commit -m "Add GitHub Actions workflow"
git push
Step 6: Configure GitHub Repository
In your GitHub repository settings, go to the "Actions" tab to make sure the workflow is recognized. The action will trigger automatically upon your next push to the main branch.
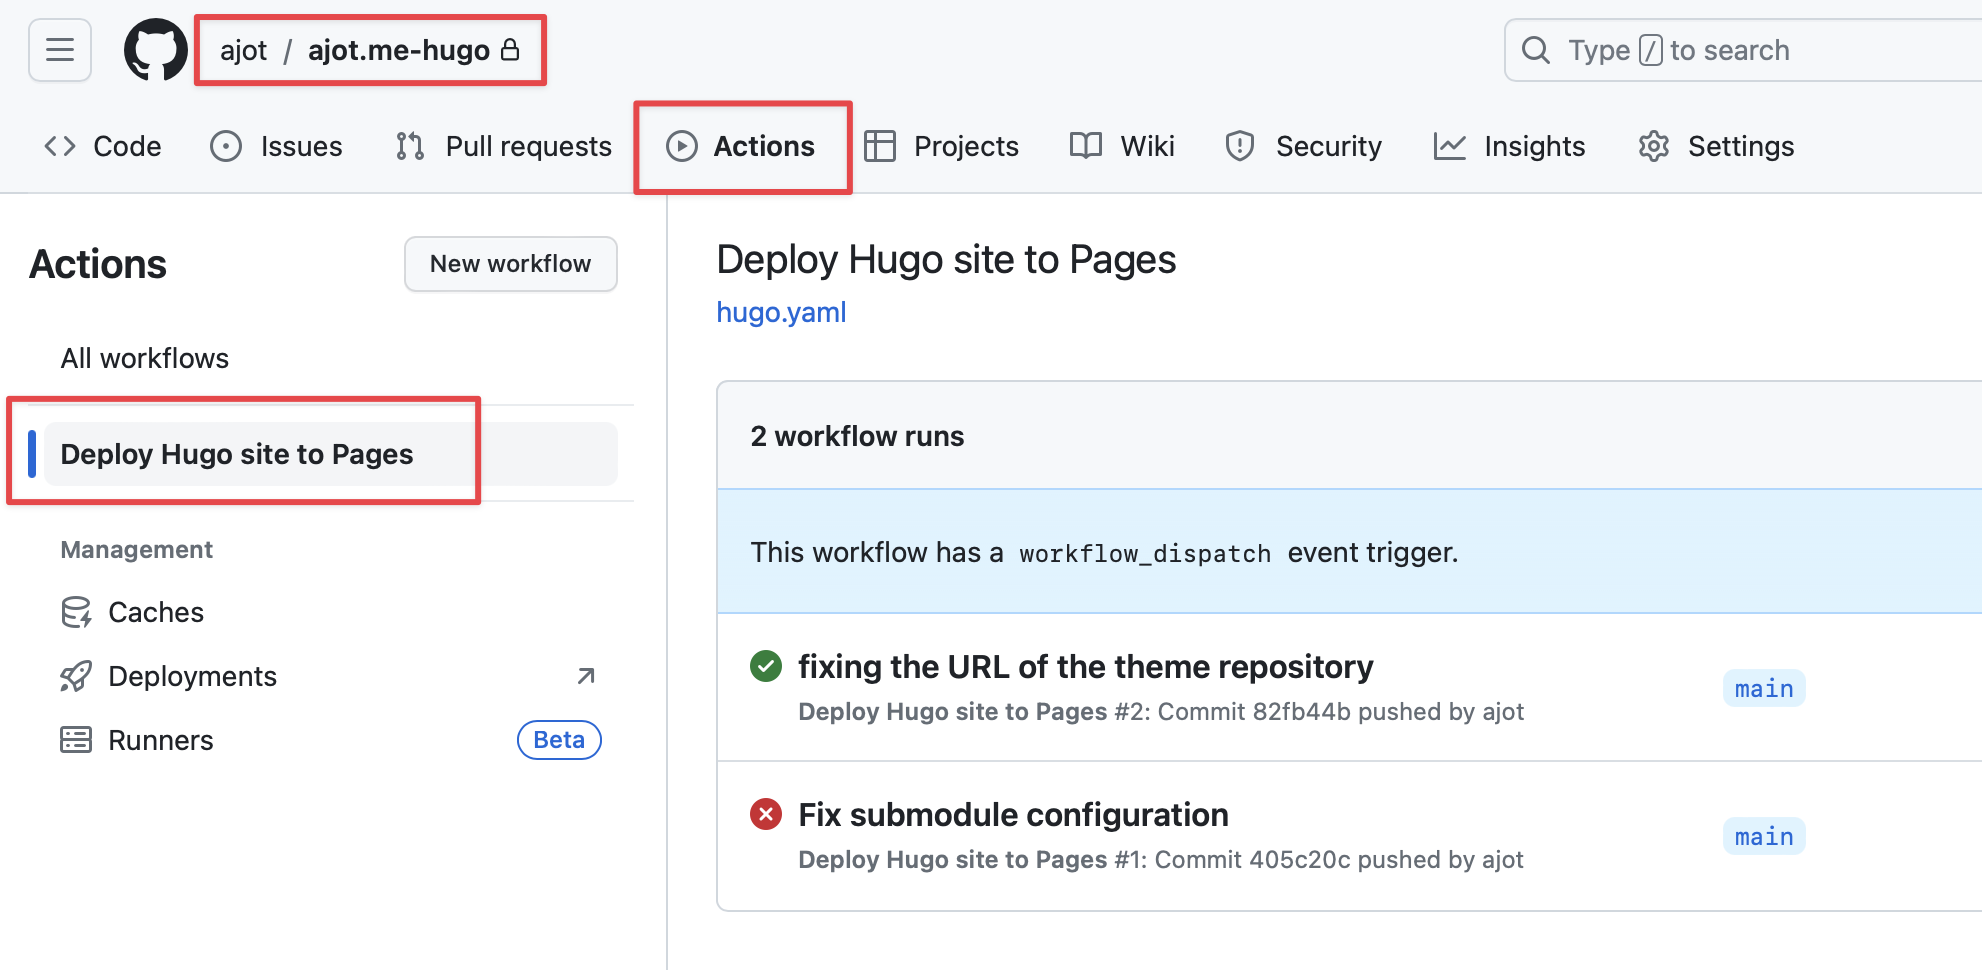
Step 7: Verify Deployment
After pushing any changes to your main branch, go to the "Actions" tab in your GitHub repo to see the workflow in action. If it completes without errors, your site should be published to GitHub Pages.
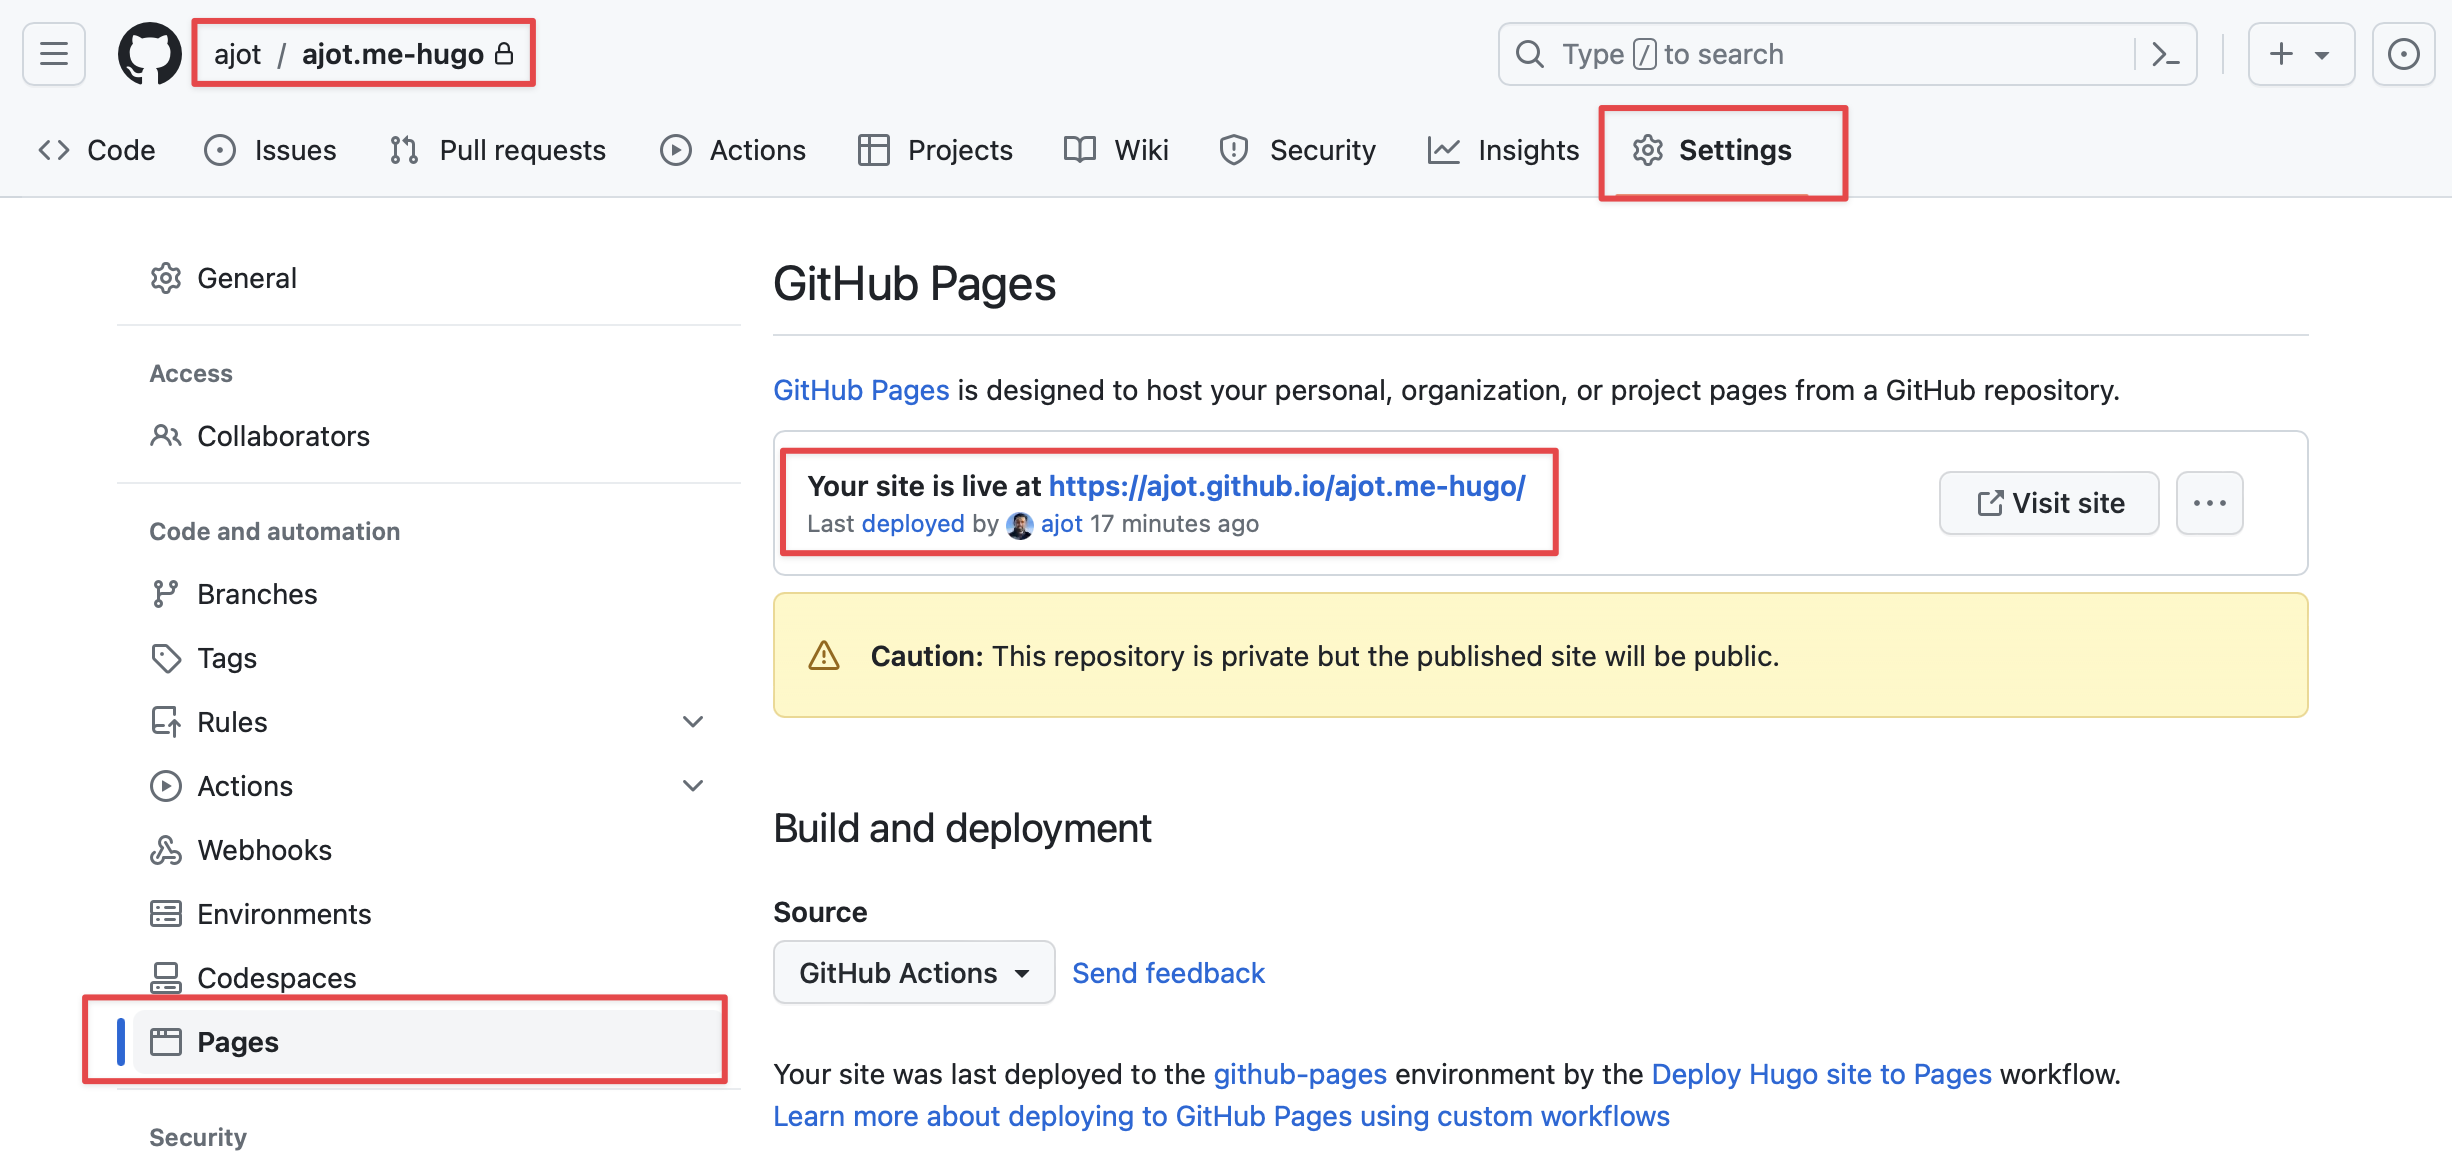
Step 8: Access Your Site
Your site will be accessible at a URL based on your GitHub username and repository name, something like https://YourUsername.github.io/YourRepo/.
Click on "Settings" tab, and then click on "Pages" on the sidebar. You should see the URL your site is live at.
And that's it! This setup will now automatically build and deploy your Hugo site to GitHub Pages every time you push to the main branch.